by guest blogger Carol McIntyre
It was a dream come true. I had a 600 square foot art studio in my new home, but then reality set in. How was I going to furnish it with limited funds?

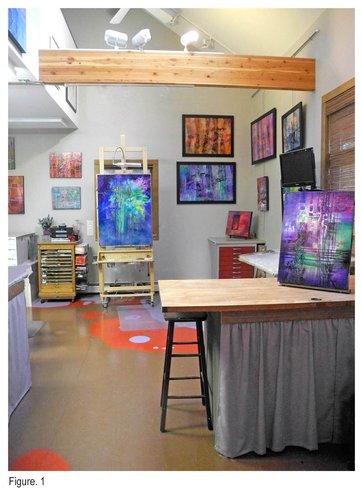
In alignment with my desire to recycle whenever possible, I began with obtaining used cabinets and furniture (Fig. 1). Many of my studio furnishings were found in used building supply and consignment stores, and I was creative with the use of inexpensive hardware and bartering.
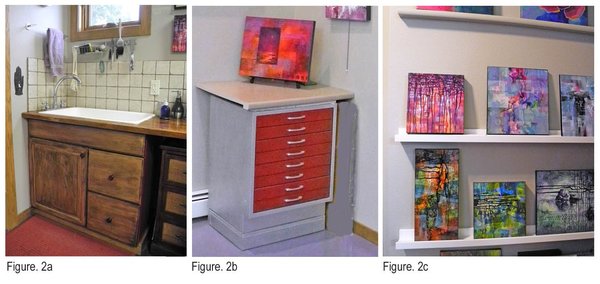
My sink area is about 48”wide by 24” deep so I needed a used bathroom vanity for that area. It took a few trips to different used building supply places to find a vanity that had the cabinet and drawers I wanted (Fig. 2a). I sanded and stained it to the desired color. A friend, who was remodeling an old house, offered me a perfect old shallow porcelain sink. The butcher block counter top came from used restaurant supply store.

A handy man cut the butcher block table top to size, attached the top and installed the sink and a new faucet. I applied epoxy to the butcher block counter because a lot of water was going to be tossed about. The backsplash was created from the tile found in a used supply store. For the utensil rack above the sink, I attached kitchen items I found at IKEA. All told, I believe my entire sink area cost less than $125.00.
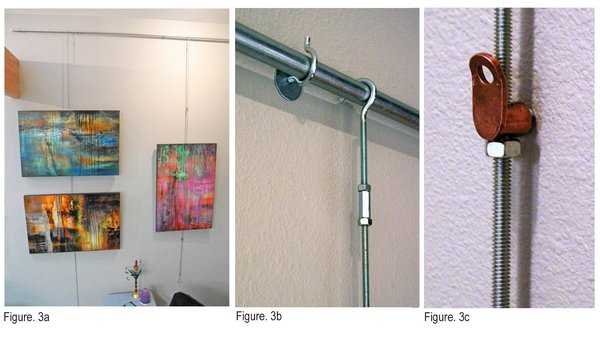
My wall hanging system (Fig. 3a), was created using electrical and hardware items found in any hardware store. You will need a ladder and a few tools to install it along with help from a friend and some patience.
Wall Hanging Materials: (quantity depends on width of hanging system)
- ¾” conduit cut to desired length
- #6 screw hooks
- Nut and bolt locker such as Locktite
- Terminal or mechanical lugs that are then bent to act as a hook to hang a painting
- ¼” fender washers
- Some kind of glue, such as super glue to adhere the fender washers to the wall
- ¼” hex nuts
- ¼” bolt hooks
- ¼” threaded rods at desired lengths
- Coupling nuts
- Drill and bits, measuring tape and marker

The horizontal rod running across the top of the wall is a ¾” electrical conduit pipe cut to length with a hack saw (Fig. 3b.). Mine is 9′ long. To hold it up, you need bolt hooks that are screwed into the studs. I glued fender washers to the wall (the washers you see at the base of the hook) to provide more stability and a finished look. White caps are added at each end of the conduit rod to keep it from damaging the wall if it moves.
The vertical rods that hold the paintings are made from ¼” threaded metal rods. They are available in various lengths. Use a ¼” coupling nut to attach two rods together if necessary. For the hook on the top of the vertical rod, I used a ¼” bolt hook, coupling nut and hex nuts (Fig. 3b). Locktite or some kind of nut locker liquid was applied to the nut threads to prevent loosening.
The ¼” copper terminal lugs become the painting hooks (Fig. 3c). These slide up and down the ¼” threaded steel rod, and all you need is a ¼” hex nut to stop the lug where you want to hang a painting.
This system of hanging paintings has proven to be durable and flexible over the years. I love not nailing into my two studio walls and dealing with repairing them. The cost for these two systems was less than $50.00.
Another idea for furnishing my studio was making a peninsula built from three lower kitchen cabinets as a base and a plain hollow door for the countertop. You can see the back of it in Fig.1. I had a few inches sawed off, then sanded it and applied tung oil. The door was attached to the cabinets with L brackets. Used building supply places have tons of doors, and they also have used kitchen counter tops which make for great flat work areas.
One of my favorite finds was a small metal flat file from a chemical lab (Fig. 2b). It was badly scratched and the color was unattractive. After I cleaned it with fine steel wool and applied silver and red spray paint, it looks as good as new. I built a wooden platform to raise it to counter height. A short used kitchen counter sits on top of it.
In addition to this storage, I have a 5′ wide by 4′ deep by 3′ high carpeted framing table, and a 14′ high by 6′ wide by 18” deep antique cabinet attached to a studio wall. The framing table was made by a friend, for which I bartered. I obtained the antique cabinet in exchange for a large painting. The latter is great for art materials, camera equipment, still life objects, fabric, sketchbooks, and stuff – all those yummy art materials we have!
For my field studies and small paintings, I installed IKEA picture holders on a short wall in the studio (Fig. 2c). I love having this area because of the flexibility. I should add that while I was in the used restaurant furniture/supply store, I found a perfect rolling cart that’s employed daily for my wet palette, paints and brushes. These used supply stores are fun to explore. You never know what gem you might find!
Finally, I needed to cover a 9′ high by 66” wide by 40” deep storage unit that I built for paintings, boards, frames, large portfolios, mat board, etc. I installed a hanging rod, duplicating the same system of conduit pipe and hooks I used for the hanging system. However, the screw hooks were drilled into the ceiling. I bought a white shower curtain and hung it from the rod using shower curtain hooks. Since the curtain was not long enough, I extended the length with gray fabric.
We artists are marvelous problem solvers. Hence, my guess is that you have created something on a budget that facilitates your functionality in the studio. Please share your creations.
 Carol McIntyre is a painter, color expert and teacher (as well as an inventive studio designer!) based near Colorado Springs, Colorado. Visit her website to learn more.


Lovely!