By guest blogger, Scott Mead
Professional photographer Scott Mead gives a few tips on capturing great images of your work, in Part One of his series on the importance of the picture.

Setting up for a shoot
Last week at one of my regular shows, a fellow artist asked me for some advice on taking images of their work. They went on to explain that they needed photos for a new catalog and their website, and that they had tried taking pictures indoors, outside, on their patio, but they never looked great, only okay – especially when viewed online. Looking at their images, I could immediately see the problem: everything was hand-held, shot in harsh light and the backgrounds were competing for attention with their pieces.
We sat down at a local coffee shop, and with brew in hand, I started to outline the basics:
First, never underestimate the importance of a picture, especially when the intent of the image is to call someone to action. Photography plays a huge role in doing just that, whether it’s an image of a sports car on a twisty road for a Jaguar ad; one of Robert Glenn Ketchum’s indelible images of Alaska’s Tongass Rain Forest, to save 17 million acres of old-growth forest; or an image of a local artist’s jewelry on their Facebook page with the hopes of selling it to a fan of their page.
When Frederick Barnard coined the phrase, “a picture is worth a thousand words” in 1921, he was closer, and farther from the truth. Depending on how the subject is lit, the image is composed, and the focus, an image may conjure up a couple words, or even millions. An image can compel someone to pull out their credit card no matter the price, or tell their friends to never buy a particular item.
A picture can also be misleading. Take your local fast-food restaurant for example: The menu board depicts mouth-watering burgers, larger than your hand, expertly crafted with the perfect amount of condiments, made fresh and steaming hot. You order that magnificent looking Double Bacon Belly Bomb, and you start to salivate uncontrollably waiting for your order… that you have in-hand mere minute later.
You open the carton to find a sandwich that’s little bigger than a slider, and with less moisture than beef jerky. Sure enough, it has bacon on it, but it looks like it was harvested from a plastic pig. Add the wilted lettuce, blobs of catsup (replacing the tomato that they ran out of) and two onion rounds smashed between the halves of a day-old bun, and your appetite shrinks to the humidity level of Death Valley in August. You look at the burger in your hand, then the photo on the board and the real deal looks nothing near the photo on the board or what you had in your mind.
But the picture got you to buy the burger in the first place, Right? Ahhh… The importance of the picture.
Properly photographing your items is not a daunting task, though it does take an investment in time, and a little money. What you’ll need depends on what you’re shooting, and size does matter – jewelers can get away with a small setup, while 3D artists will need a bigger kit.
Let’s start with a basic checklist:
- Camera – It can be film or digital, single lens reflex (SLR) or point-and-shoot. Digital cameras should have no less than 8 megapixels, preferably double that.
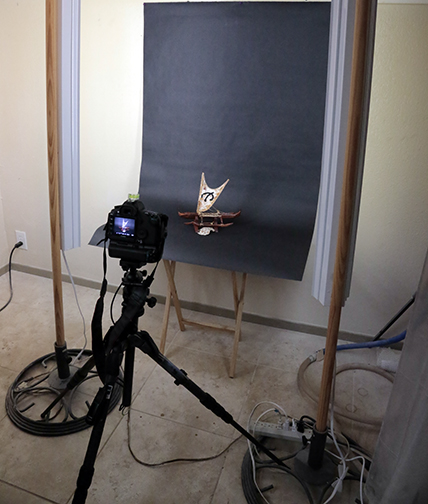
- Tripod – the only way to get really crisp, clear images is to put the camera on a tripod. It needs to be sturdy enough to properly hold your camera with the heaviest lens attached, and not be affected by wind. For beginners, I always suggest purchasing a tripod/head kit.
- Lights – Photography is all about capturing light, and it’s here that an incredible image is made, or not. For most applications, two lights are needed, sometimes three. What you’re shooting will dictate the type and size of lights you’ll want to have.
- Backdrop and Stage – This is probably the easiest part. The “stage” that you set your piece on can simply be a table or even a TV Tray placed next to a wall. Getting a backdrop is as easy as making a trip to your local fabric store and purchasing a couple yards of white or black cloth (satin or fleece works well). Just iron out the creases and tape one end to the wall and let it drape over the table.
In my next post I’ll go over what lights to use for your type of work, setting up the shot and capturing images that will make your pieces pop on paper and the web.


I look forward to your next posts Scott. Thank you for the useful information. I have yet to have seen a burger that looks as good as what the photograph depicted!
Scott Mead speaks the truth!
There is an enormous increase in photos being uploaded every day to on-line shopping sites by artists and crafters – must be numbering in the 10’s of thousands? – and most of it is very poor quality. It took me many months of trial and error, but most people feel my photos are “professional”. In fact, I occasionally get an email from someone “accusing” me of not giving proper credit to the photographer which pleases me to no end.
But I am quite convinced that everyone – including me – can be better at this and look forward to Scott’s next posting!
You hit on something that rings true with millions of artists, Mckenna: At some point and time, we’ve all spent untold hours trying to get that “right” image of our work. My next post will introduce you to all the important pieces of the photographic puzzle, and put them into perspective. After this three-part series is posted, I’d love to hear from those who try my tools and techniques to make indelible images of their art!
Great article and Scott Mead hit it on the head about studio work.